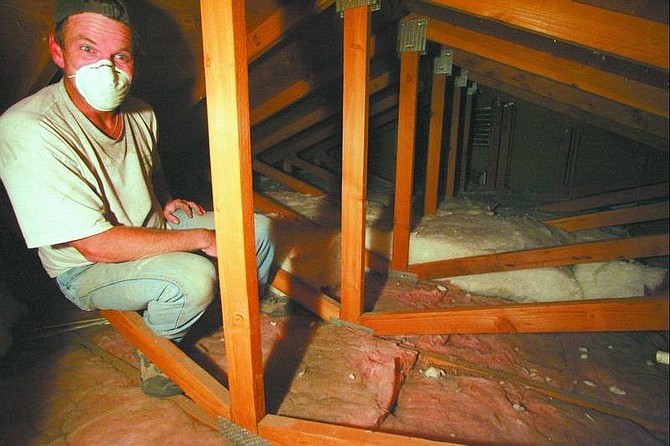
BRAD HORN/Nevada Appeal Todd McPhail installs thicker insulation material into the attic of a north Carson City home. The insulation will help keep the home warm in the winter and cool in the summer.
I hate to tell you, but it's going to get a lot colder out there. Which means you'll be fiddling with the home thermostat, seeking to keep warm, and, at the same time, not bust the bank.
If your home was built in the last decade, weatherization insulation usually isn't a problem. Code updates, better building practices and materials have pretty much gone just about as far as one needs go to keep warm and hold the budget line. But for those of us in older homes, insulation has become critical, with predictions of soaring costs for gas and electricity.
The amount of insulation you need depends on the climate, type of heating (gas, oil, electricity) you use, and the section of the house that you plan to insulate.
The attic is the first area to consider because it is accessible and therefore less expensive to insulate. Windows are also big heat losers, but we've recently discussed building storm windows, so let's look at insulation for the attic for this home.
An inspection of the attic reveals old, 4-inch-thick R-13 insulation batts. In 1975, this was pretty typical, but today, an R-30 is more appropriate, with higher insulation values desirable as well.
The first task was measuring the surface area of the attic. In this case, the attic overlapped two rooms, the main room and half of a bedroom. It worked out to be about 400 square feet.
With the original insulation probably having settled to less than the original 4 inches, new insulation to meet Carson City weather requirements (R-30) probably meant at least a new layer of R-30, placed right on top of the old. There was no way to combine an R-27 with the old R-13 - that doesn't exist. So new R-30 was the answer, at about $60 a bundle of 24-by-48-inch batts covering about 88 square feet. That meant at least four bundles of batts for $240.
Getting started
Access to the attic was through a 24-by-24-inch trap door in the second bedroom. An ordinary, 6-foot step ladder could furnish access for an agile installer.
In this case, the installer would be a veteran whose summer job of installing and maintaining sprinkler systems was winding down. Todd McPhail had been installing insulation for years, before moving down to earth for sprinkler maintenance. But now most lawns were set for winter, and Todd was ready to move on.
The large bales of batts were squeezed into the back of an SUV in two trips. Tools needed were a long knife to trim batts and a pole to push them into position in low roof areas. It would be a two-person job - one to hand up the batts through the small trapdoor, the other to place the batts.
Opening the bales was easy, and using the original wrapping material was a good way to tear off the facing (we couldn't find any unfaced batts).
Once unwrapped, the batts expanded to 10 inches thick.
Getting the batts into the attic
Todd, a limber 6-foot-plus, climbed the 6-foot stepladder into the trapdoor and into the attic. His helper grabbed a batt and shoved it in the trapdoor; Todd pulled it in. About six batts were passed along before Todd called a recess while he began laying them between rafters, using a long pole to push them into low corners.
Six batts at a time went through the trapdoor, then a pause ensued while Todd pushed them around. He was wearing a face mask all the time, as much to protect himself from the attic dust as from the insulation fibers. Nails protruding from the roof were a constant problem; one doesn't stand tall in attics.
In about two hours, all the batts were in place, including one on the trapdoor.
The results
On a subjective level, the homeowner at once noticed a warmer feel in the house, and the thermostat confirmed it. The furnace still roared away at times, but much less often than in the past.
The final report won't come until the winter is farther along and the gas bills can be compared to last year's. The bills will undoubtedly be higher, but, with luck, not at the wallet-busting level.
Calculating the insulation amounts
A computer program is available to help calculate the amount of insulation appropriate for your house. The program is called the "ZIP-Code" because it includes weather and cost information for regions defined by the first three digits of each postal service ZIP code. The program also allows you to define local costs and certain facts about your house to improve the accuracy of the recommendations.
Homeowners compare the R-value of their existing insulation with the recommended R-values, plus factor in your type of space heating. Using the recommended R-values, subtract the R-value of the existing insulation. The result will be the R-value you should add.
When you stack new insulation on top of existing attic insulation, the existing insulation is compressed a small amount. This will slightly decrease the total R-value of the insulation. This effect is most important if the new insulation is more dense than the old.
You can compensate for this stacking effect and achieve the desired total R-value by adding about 1 extra inch of insulation if the old insulation is fiberglass, or about 1Ú2 inch if it is rock wool or cellulose.

Comments
Use the comment form below to begin a discussion about this content.
Sign in to comment