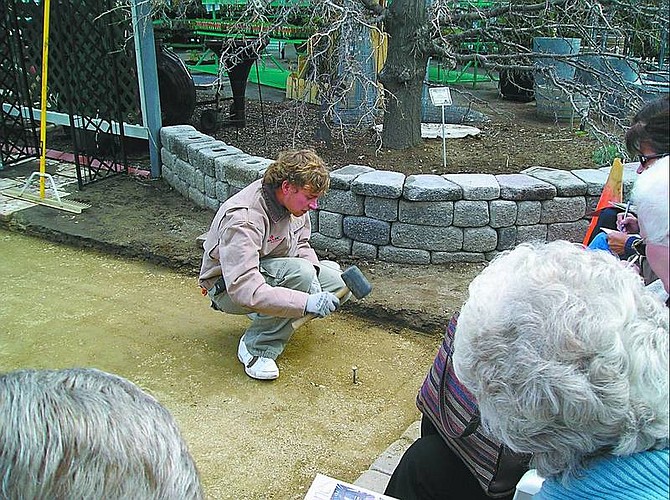
Sam Bauman/Nevada Appeal Professional paver Bryan Gilles shows how to test base for compactness. If the spike goes into the gravel easily, it's not packed enough.
It's spring, and the time for all good homeowners to start thinking up projects. One that seems to be popular these days is adding a paved stone walkway or patio pad to the home. In this case, "paved" refers to individual stones placed in neat patterns, preferably by the homeowner's hands.
Paved areas do add beauty to a garden or patio, or to the path leading to the home's front door. And the home and garden stores offer all kinds of paving stones and advice on how to do it.
Well, the way owner David Ruf explained the process at a recent seminar at the Greenhouse Garden Center in Carson City, it's a fine idea, "but there's a lot of work involved."
Addressing some 30 participants at his Greenhouse lecture, he said, "If you're going to pave an area 8-by-25 feet, you're going to have to move about 100 wheelbarrows of dirt away - and find a place to get rid of the dirt."
Pause.
"That's a lot of work."
Preparing the location
Ruf backtracked then to get into the basics. "You have to dig down about 6 to 8 inches for the base and another inch or so for the sand layer that goes on top of the base. That's for a patio or walkway. A driveway you have to dig deeper."
Ruf had prepared an area already for the seminar. It was about 8-by-20 feet, and the surface was a brown mixture of dirt and small stones. He had used a front loader to excavate the area and then to remove the ordinary dirt.
"The base is crushed rock gravel, the same that is used for highways. It's been washed and cleaned so no seeds are in it."
You can buy it at supply stores in bulk to be delivered to your site. Discuss the amount with the store salesperson.
Ruf had already smoothed the surface of the base, but now he called a professional team to take the next step - compacting the base. Compacting machines come in various sizes and are available for rent. The base should slope about one-quarter inch per foot to allow for drainage.
Compacting
With the base excavation extending about 6 inches beyond the desired area, the operator started the gasoline-powered compactor and slowly moved it around the edges of the base. He then ran the compactor back and forth across the area, then went around the edges again. Another worker smoothed sections by hand with a heavy compactor tool, areas that the compactor couldn't get to.
To test the compacted base, Bryan Gilles drove a 10-inch spike into the mix with a mallet. It shouldn't go all the way in, Ruf explained.
Edging
"You can do the edging with either plastic or metal parts," Ruf explained, as he held up a shiny 8-foot-long piece of pierced steel. "You first lay out the area with string attached to posts, in this case the 10-inch grooved nails."
Care must be taken to make sure the area is square (in this case) and as the edgers were nailed in position the long nails were used to hold them there. Constant readjusting was required to maintain the right angles.
With oddly shaped areas plastic edging is often added later.
Adding the sand
Sterile sand goes down over the base in a 1-inch layer. To make the sand thickness uniform, 1-inch diameter pipes are placed over the base, sand added and then leveled with two-by-fours on the pipes. The pipes are then pulled out and their ruts filled with sand by hand. Pipes are moved along as the sand is added.
Laying the bricks
Paving bricks are different from those used on house walls; they are solid, without holes. There are two types: bonded (3 3/4 inch-by-7 1/2 inch) or 4 inch-by-8 inch pavers for sand-based applications and modular pavers (7 5/8 inch-by-3 5/8 inch) for mortared applications. Sand based methods are more popular. Pavers are in two thicknesses: 2 1/4 inches and 1 1/inches.
"If you're working on a slope, start from the bottom and work upward. Start at any convenient corner, snugly butting the bricks with about one-eighth of an inch between them.
"It's best to pick dimensions where cutting bricks can be avoided as much as possible," said Ruf. "A brick splitter or a power saw with a masonry blade can be rented from a local equipment rental store. But be careful, don't stress the diamond blade, which costs about $165 to replace."
Sweeping the sand
"You've got to get sand in those cracks between the pavers," Ruf said. "You scatter dry concrete sand over the area and sweep it into the small cracks. The sand holds the bricks tightly into place creating interlock."
This may take several tries of adding of sand and lots of sweeping, since the sand will slowly settle into the joints.
A do-it-yourself job?
"As I said, there's a lot of physical labor involved in paving with bricks," Ruf said. "And you need lots of equipment for a sizable job. You're not saving a lot of money doing it yourself. If you're going to try it, go for a small area to get an idea of the effort involved."
• Contact reporter Sam Bauman at sbauman@nevadaappeal.com or 881-1236.

Comments
Use the comment form below to begin a discussion about this content.
Sign in to comment