Pinboards are buzzing with endless inspiration, bringing clever and colorful projects to life. For brides to be, the hottest looks in wedding decor can be yours with just a bit of creativity.
The evolution of touch is underway, with fabrics and embellishments featuring texture and intrigue becoming huge hits this bridal season. Take materials such as burlap, chalkboard finishes, monogram letters and mason jars to the next level by mixing and matching with the season’s colors.
Picture your big day with pretty petals adorned in lace offset by rustic trimmings. This understated yet feminine look can be yours with these trending projects from the crafting experts at Jo-Ann Fabric and Craft Stores. Take these ideas and gather your girlfriends for a pre-wedding craft session. You’ll love unleashing your creativity as well as the extra bonding time with the girls, all in preparation for the big event.
For more ways to add trending touches to your wedding, visit www.joann.com.
Burlap Cone Floral Hanger
Crafting time: 1-2 hours
Skill level: No experience necessary
Supplies and Tools:
Cutting utensils
Thin wire
Wire or boutonniere pins
Panacea burlap garland
2 Styrofoam brand foam cones
Glue gun
Glue sticks
Ribbon of choice
Hydrangeas: 1 green and peach, 2 peach and cream
Green mini bundle
1. Cut wire into hairpin shaped pieces or use boutonniere pins.
2. Cut 1 yard of burlap per cone. Fold burlap in half and wrap cone from bottom to top. Pin burlap to cone. Not all of it will be covered. Run glue along seam; press to secure.
3. Attach ribbon to create hanger. Glue in place.
4. Trim hydrangea short. Glue to top of cone. Trim several clusters from hydrangea. Glue to cover exposed foam, creating a dripping ice cream affect.
5. Trim half of mini bundle and glue in center.
6. Trim blossoms of green hydrangea. Glue to both cones.
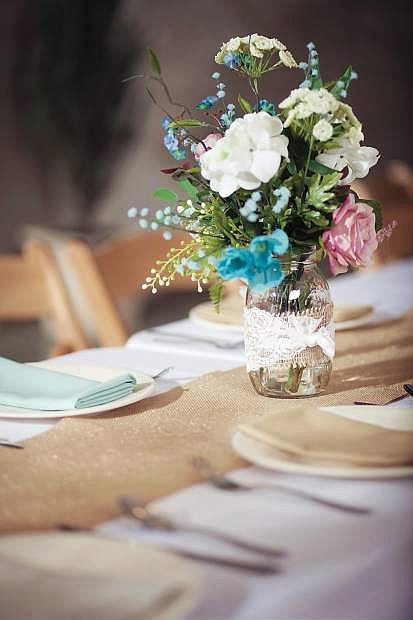
Burlap and Lace Wrapped Floral Centerpiece
Crafting time: 1-2 hours
Skill level: Some experience necessary
Supplies and Tools:
Cutting utensils
Pink roses stem
White Queen Ann Lace stem
White hydrangea bush
Light blue small bush
Pink small bush
Teal small bush
Teal tall bush
Cream wisteria garland
Panacea cloth-covered wire
Glue gun
Glue sticks
David Tutera burlap ribbon
Mason jar
David Tutera lace ribbon
Panacea crystal clear resin
1. Trim stems, removing lower foliage.
2. Form a hand-tied bouquet.
3. Tie off with wire.
4. Dribble glue around wire to secure. Let dry.
5. Wrap burlap ribbon around Mason jar, overlapping 1 inch. Glue seam.
6. Wrap lace around jar and tie in knot.
7. Pour resin in jar. Follow package instructions.
8. Insert bouquet. Allow to dry.

Comments
Use the comment form below to begin a discussion about this content.
Sign in to comment